The Mermaid Voodoo Doll

Some friendships are weird. My friendship with my best friend Kate is especially weird. Over the summer she got a drastic haircut so she sent me a braided lock of her hair in an envelope full of glitter. Since she lives in New Orleans I thought the perfect response would be to use that hair on a voodoo doll. However I could only find a pattern for a felt mermaid in my mom’s craft books. So a mermaid voodoo doll it was.

P1000237

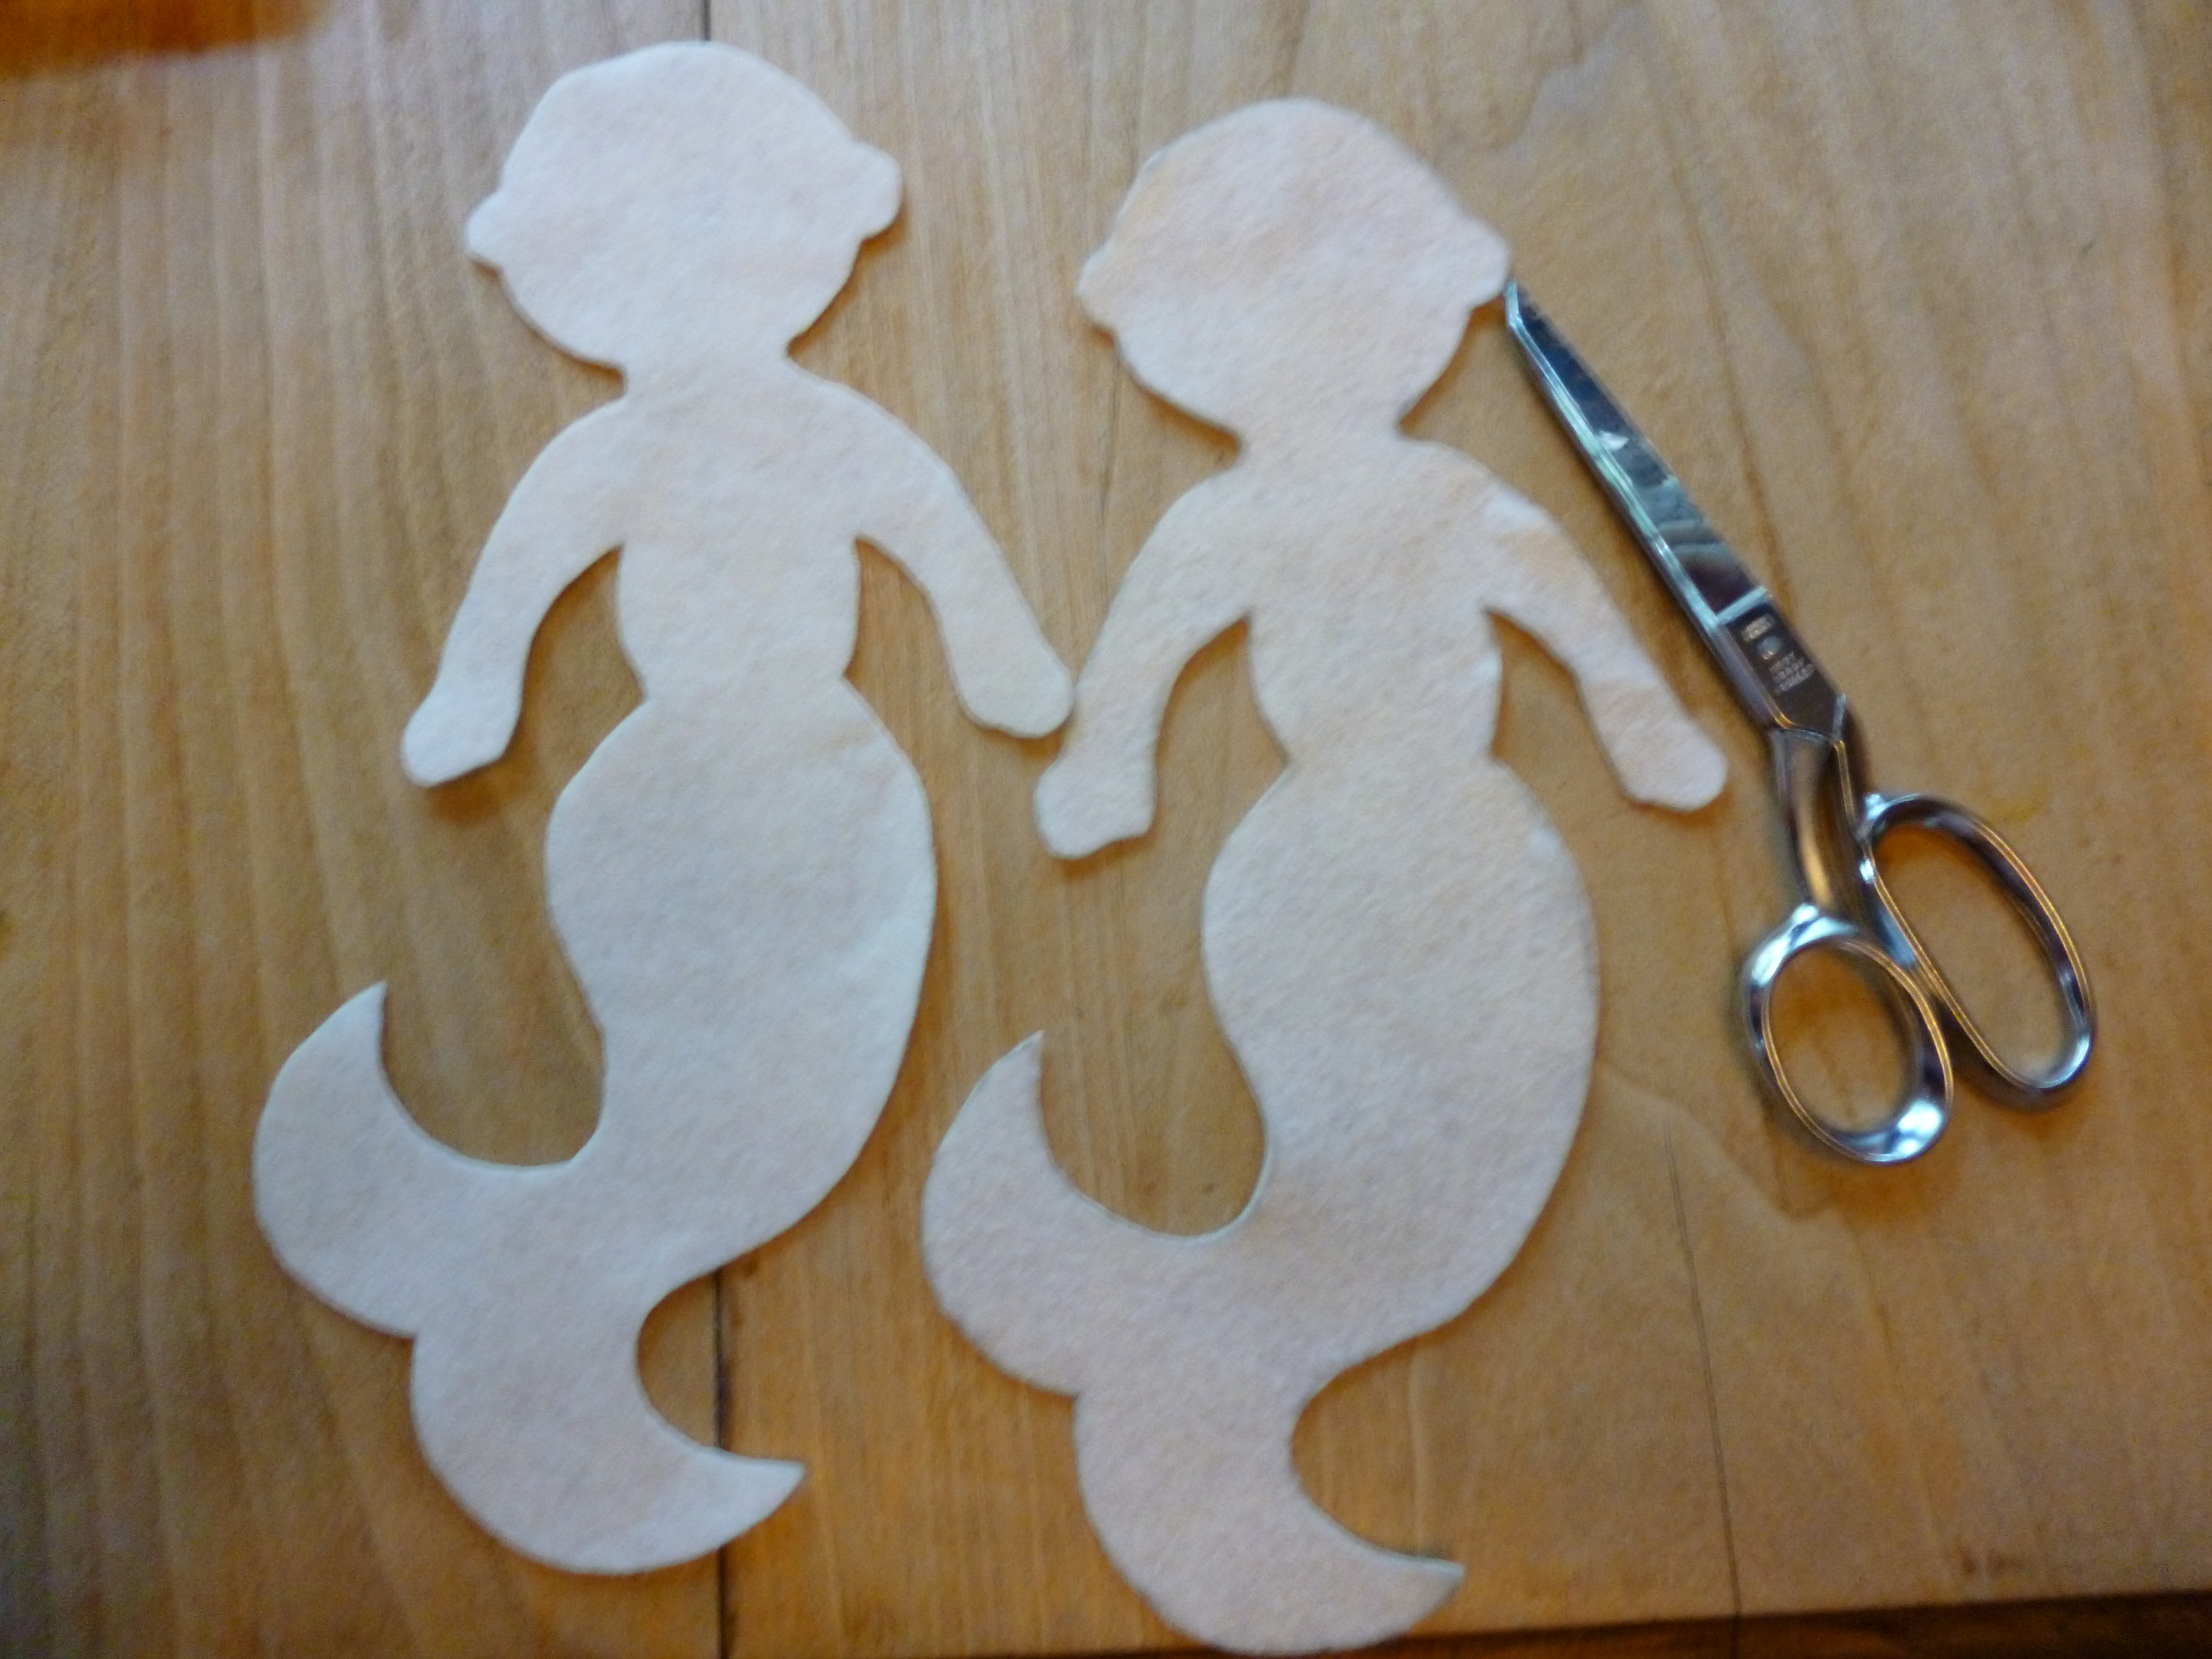
Step 1: Draw an outline of a mermaid onto a piece of paper and cut it out.

P1000238

Step 2: Pin the paper mermaid onto a piece of felt. Trace the outline. Repeat. Cut out both felt mermaid outlines.

P1000239

Step 3: Use embroidery thread to decorate each side of the mermaid and then pin the two pieces together. Stitch them up, stuffing the mermaid with cotton as you go.

P1000242

P1000243

Step 4: Stitch your voodoo mermaid’s hair on. If you want a more normal mermaid doll you can use yarn for this. Admire your glorious handiwork. Have a photoshoot. Mail it to your best friend.

photo

Avocado Tree: Week 12

Confession: this is a different avocado pit than the previous two posts. Just as I’ve been neglecting my blog this month, I have also been neglecting my little avocado trees. Luckily I have this backup pit with a ferocious will to live. Even though it’s almost dried out twice the taproot has been growing from the bottom for a few weeks.Image

Denim Jacket to Vest

Turn that hand-me-down denim jacket that you rarely wear into a denim vest! I’m seeing them everywhere these days and I secretly adore them so I had to have one for myself. I’ve never particularly liked this denim jacket and the sleeves are so constricting so…problem solved!

P1000211P1000229

All you have to do is cut along the seam where your sleeves are attached to your jacket. Don’t worry about fringe or a jagged line – its supposed to look a little rugged.

P1000230

Now that you’ve got your super hip denim vest, go have a little fun…

vest

Honestly it started raining as we were taking this picture so I actually just ran back inside and put my pajamas on, but I will have fun in my vest soon!

DIY Shirt Mods: No-Sew Side Tie Tank

I saw a fantastic post on Buzzfeed recently entitled, “31 T-Shirt DIYs That Are Perfect for Summer” which had some great projects for my blog. And seriously, anything I can do you can definitely do just as well if not better. I made this blog to enhance my crafting skills as well as show how easy DIY can be.

Without further ado, here is the Side Tie Tank. No sewing necessary.

P1000204

You’ll need:

  • pencil
  • scissors
  • t-shirt

Step One:

P1000199Lay your t-shirt out on a flat surface and draw a line long both sides of the front. The closer your line is to the collar the thinner your tank straps will be. Then flip your shirt and continue the two lines down the back.

Step Two:

P1000201Make sure the ends of the lines meet at both the top and bottom of your shirt. Then cut along the lines. You should be left with a weird t-shirt poncho. This means you’re doing it right!

Step Three:

P1000203Tie the ends together on both sides and…

P1000209

…enjoy the cool summer breeze on your toasty sunburned torso!

Helpful hint: If you find that your traps are too wide use a scrap from your shirt to tie them tighter.

Decorating with Shoes

I love shoes. They come in so many shapes, sizes, and patterns and you hardly ever grow out of them. When I see an especially wonderful pair, like sparkly pink heels, how can I resist if they’re on sale? The truth is that I can’t resist. And because of that I have too many shoes to wear. It’s the best kind of dilemma.

One thing you can do with cool pair of shoes is put them on display! I’ve only worn these floral stilettos a few times but I love to look at them. Display your favorites on a bookshelf or windowsill. However, if you decide to place the shoes on a windowsill the sun may bleach them. So if it’s a pair you care about keep them in the shadows!

P1000189
Bonus tip: a dark window will reflect your fairy lights making it look like a starry night sky.

Paper Heart Garland

As you may have already guessed, I love using scrapbook paper for things other than scrapbooking. Here is yet another project using those little packs of paper you can pick up at Michael’s or Paper Source.

P1000182

You’ll need:
-pencil
-ruler
-scissors
-stapler
-paper
-string (I usually use Baker’s Twine)

Step One:

P1000171

Cut your paper into strips with a width of one inch. They don’t have to be the same length.

Step Two:

P1000173

Use one short strip for the center and then pinch the edges of three or four strips of longer paper against  each side of the middle of the center strip. Staple them together and then bring each strip down to the bottom edge of the center strip.

Step Three:

P1000175Arrange the hearts so they are evenly spaced, snip off the ends, and staple them together at the bottom of the center strip.

Step Four:

P1000179Poke a little hole through the top and thread the string through to hang up the hearts.

Note: The type of paper you use will change the shape of the heart. If made with construction paper the heart will be plump and a little floppy. The paper I used is thicker and was a little harder to work with – once I shaped it into a heart it didn’t want to shift positions very much.

Big Stitch Crocheted Rug

I started working on my first crochet project over spring break and it’s finally done! Here is my slightly goofy and certainly not perfect circular rug:

P1000146

I used three balls of super bulky cranberry yarn and an S crochet hook. The diameter of the rug is about 30 inches.

P1000148

I’m hoping to flatten out the edge with some light reading but if that doesn’t work I might try wetting the yarn a little.

I found this pattern from The Purl Bee – check it out here: http://www.purlbee.com/the-purl-bee/2011/9/29/big-stitch-crocheted-alpaca-rugs.html

Not Your Average Sandwich…or Triscuit

It’s 8:30 on a Thursday night. The dining hall is closed and there’s a “wintry mix” coming down outside my window and there is no way I’m going outside again tonight. In the fridge I know I have ham, Laughing Cow cheese, and half of an avocado, but unfortunately my last English muffin has mold creeping up the sides. There’s a little convenience store in my dorm but of course they don’t sell bread so I grab a box of my roommate’s favorite crackers – Triscuits.

Image


And OH MY GOD these things were AWESOME!! Does anybody remember Lunchables? I for one will never forget them – my favorites were the little ham and cheese ones and here I managed to RE-CREATE THEM minus all of the preservatives and artificial whats-its. All you need are Triscuits, ham, creamy swiss, and a little avocado and you’ve got yourself a Lunchable fit for a real life grown up.

Scrapbook Paper Elephants

Image
You’ll need:

-scissors

-pencil

-eraser

-tape

-baker’s twine

-a sheet of white paper

-fun scrapbook paper

Image
1. Sketch out the shape of the elephant you want. Don’t worry about making it perfect – it’s just an outline and every time you trace it and cut it out the shape will change a little anyway.

2. Cut the elephant out and use this as your stencil.

Image
3. Cut out your elephants and tape them to the baker’s twine

4. Hang them up wherever you please!

Image


The inspiration for the project came from: http://lovepeacepionies.blogspot.com/2011/03/jeg-blir-alltid-inspirert.html